
This checklist is for software QA and development teams building a practical bench for testing connected devices, interfaces, and embedded projects. It covers a mix of measurement and capture tools, plus a few setup essentials that are useful to think through before choosing products.

Get business pricing on monitors, keyboards and dev gear
- Business-only prices and quantity discounts
- Tax-exempt purchasing
- Multiple users, one account, clear invoices
The sections follow the listed checklist slots: each one explains the role of that tool, offers buying considerations, and identifies a product pick where one was provided. The programmable USB hub and hardware test fixture sections are advice only, with no named product.
Use the checklist to match each tool to your test setup. Confirm connection types, channel or port needs, supported operating systems, and physical fit against your own equipment before buying; product names alone do not establish compatibility.
USB Logic Analyzer
A logic analyzer can help teams inspect digital signals while diagnosing device behavior, making it a useful consideration for hardware debugging. The listed pick is the Saleae Logic Pro 16-Channel Logic Analyzer, Red. Before choosing it, map the signals you expect to observe and check how many channels your test setup needs; a channel count that does not cover the planned connections can leave tests incomplete.Common buying mistakes include assuming a product name confirms compatibility with your host computer, software, voltage levels, or probes. Verify those details against the manufacturer’s documentation and your test targets. Also consider how the analyzer will sit beside the device under test: cable reach, connector access, and bench space can affect whether it is practical to use during repeated runs. Choose based on the signals and workflow you actually need to inspect, and confirm the required accessories are included or available.
What to look for:
- Channel count that covers the signals in your test plan
- Documented compatibility with your operating system and analysis software
- Probe and connector fit for the device under test
- Supported signal levels and input limits in product documentation
- Cable reach and bench placement for your setup
Saleae Logic Pro 16-Channel Logic Analyzer, Red
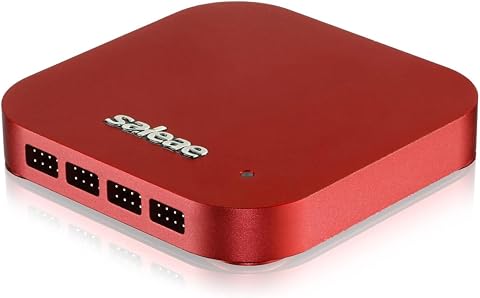
This logic analyzer provides 16 configurable digital and analog inputs, with support for SPI, I2C, and more than 23 additional protocol decoders. It captures digital signals at up to 500 MS/s and analog signals at up to 50 MS/s, and connects to Mac, Windows, and Linux systems via USB 3.0.
Pros:
- 16 configurable digital and analog inputs
- Supports a wide range of protocol decoders
- High digital and analog sampling rates
- Compact aluminum design for portability
Cons:
- Captures depend on PC memory
- Requires a USB 3.0 connection
Best for: Teams whose planned tests need a 16-channel logic analyzer
Not ideal for: Setups that have not confirmed signal limits, probes, or software compatibility
Bottom line: Check channel needs, signal requirements, and software support before selecting the Saleae Logic Pro 16-Channel Logic Analyzer, Red.
Programmable USB Hub
A programmable USB hub can be a useful part of a repeatable test bench when devices need to be connected and controlled as part of a workflow. Since no product was specified for this slot, treat it as a requirements-first choice: list the devices under test, their USB connector types, and the port count you need at the same time.A common mistake is buying by port count alone. Confirm whether the hub’s control features match your automation approach, and check host compatibility, power requirements, and any documented limits for the connected devices. Consider the physical layout too: bulky plugs, cable direction, and access to individual ports can make a hub awkward in a crowded fixture. If several devices draw power through USB, verify the hub’s documented power arrangement against your devices rather than assuming every port behaves the same way. Select a model only after you can describe how it will connect and be controlled in the actual test setup.
What to look for:
- Port count and connector types matched to devices under test
- Documented control interface that fits your automation workflow
- Host operating system and software compatibility
- Power arrangement and documented per-port limitations
- Port spacing, cable direction, and bench fit
Hardware Test Fixture
A hardware test fixture can help hold a device and organize connections during repeated checks. With no product named for this slot, start by documenting the device’s physical needs: its dimensions, mounting points, connector locations, and any access needed during testing. Those details determine whether a fixture will support the task without obstructing the parts you need to reach.A common mistake is choosing a fixture before the test procedure is settled. A design that holds one board securely may block a port, button, or measurement point needed in another test. Check the fixture’s mounting approach, adjustment range, and compatibility with the device revision you plan to test. If the setup uses probes or cables, account for their clearance and routing as well as the device itself. Confirm the footprint works with the bench and that the device can be loaded and removed in the way your workflow requires. Where possible, validate fit against a drawing or sample before standardizing the fixture.
What to look for:
- Device dimensions, mounting points, and revision compatibility
- Access to ports, buttons, and measurement points
- Clearance and routing for probes and cables
- Adjustment range for the devices in scope
- Bench footprint and practical loading and removal
USB Power Meter
A USB power meter can provide a way to observe electrical readings in a USB test setup. The named pick is the FNIRSI USB Tester 4-28V 7A LCD USB A&C Voltage Current Power Tester Mu. Check the documented electrical limits and connector arrangement against the devices and cables you intend to use; the product name is not enough to confirm suitability for a particular test.Common mistakes include assuming that a tester supports every USB connector, protocol, or charging behavior, or placing it in a setup without checking how it affects the connection. Review the manufacturer’s specifications for voltage and current limits, supported interfaces, and any stated measurement conditions. Make sure the tester’s connectors fit the cable path and that its display can be read where it will sit. If the test involves a source, cable, and device, verify the complete chain rather than checking only one component. Choose the meter for the measurements your procedure requires, and confirm its documented limits before connecting test hardware.
What to look for:
- Documented voltage and current limits for the planned test
- Connector types and fit across the source, meter, and device
- Supported USB modes or protocols stated by the manufacturer
- Measurement conditions and accuracy documentation
- Display visibility and physical fit in the cable path
FNIRSI USB Tester 4-28V 7A LCD USB A&C Voltage Current Power Tester Multimeter w

The FNIRSI USB Tester FNB58 is a multifunctional device designed to monitor voltage, current, power, resistance, and capacity across multiple USB ports. It supports fast charge protocol detection, waveform analysis, and data recording, making it ideal for testing and troubleshooting USB charging devices.
Pros:
- Supports multiple fast charging protocols and automatic detection
- Provides detailed real-time data with waveform and ripple analysis
- Includes app software for extended monitoring and data logging
- Multiple USB interfaces for versatile testing
Cons:
- No printed manual included; requires QR code access for documentation
- Device defaults to 5V output if incompatible protocol is detected
- Complex setup may require technical knowledge
Best for: Teams needing a USB tester whose documented limits match their setup
Not ideal for: Tests requiring modes or connectors not confirmed in its documentation
Bottom line: Verify electrical limits, connectors, and supported modes before using the FNIRSI USB Tester.
HDMI Capture Card
An HDMI capture card belongs on the checklist when a test workflow needs to bring an HDMI signal into a computer for capture or inspection. The listed pick is the Magewell USB Capture HDMI Gen 2 – 1 Channel HDMI to USB Video/Audio Ca. Confirm the signal path requirements before selecting it: the source output, the computer connection, and the software workflow all need to fit your use case.A common mistake is treating HDMI and USB connectors as proof that every source format or host setup will work. Consult the product documentation for supported video and audio formats, operating system support, and software requirements. Check that the source device can provide the signal you plan to capture, and that the computer has a suitable connection available. Also consider cable routing and whether the capture device can be placed where both source and host connections remain accessible. If the workflow depends on a specific resolution, frame rate, or application, confirm that combination explicitly before purchase.
What to look for:
- Supported video and audio formats for the source signal
- Documented operating system and software compatibility
- Host connection type and available port access
- Resolution and frame-rate support for the intended workflow
- Cable reach and accessible placement between source and computer
Magewell USB Capture HDMI Gen 2 – 1 Channel HDMI to USB Video/Audio Capture Devi

This high-resolution HDMI capture device supports inputs up to 2048×1080 at 60fps, delivering smooth 1080p60 video recording. It features FPGA-based processing for on-device cropping, scaling, and color conversion to minimize CPU load.
Pros:
- High-resolution support up to 1080p60 with 4:4:4 color sampling
- FPGA-based processing reduces CPU load for smoother performance
- Plug-and-play compatibility across major operating systems
- Durable design suitable for 24/7 operation with thermal protection
Cons:
- Limited to a single channel of capture
- No price information provided in source data
Best for: Teams capturing an HDMI source that matches documented support
Not ideal for: Workflows needing multiple channels or unverified formats
Bottom line: Confirm source formats, host support, and software fit before choosing the Magewell capture device.
Raspberry Pi Board
A small development board can support experiments and test setups where a separate computer platform is useful. The pick provided is the CanaKit Raspberry Pi 4 4GB Starter PRO Kit. Before choosing it, check the kit contents and project requirements: the product name identifies a board family and memory size, but does not establish which accessories, operating system, or interfaces your particular workflow needs.Common buying mistakes include assuming a starter kit includes every cable or peripheral, or assuming the board supports a software stack without checking its documentation. Confirm the included components, power arrangement, storage needs, and required network or display connections. Check compatibility with the operating system and tools used by your project, and make sure the board’s ports align with the devices you intend to test. Consider how it will be mounted and cooled in the actual setup, using the manufacturer’s guidance. Choose this kit when its documented contents and board capabilities match the planned work; otherwise, define the missing requirements before purchasing.
What to look for:
- Included components listed for the specific kit
- Power and storage requirements for the intended setup
- Operating system and software compatibility
- Required display, network, and device connections
- Mounting and cooling guidance for the planned environment
CanaKit Raspberry Pi 4 4GB Starter PRO Kit

A comprehensive starter kit for Raspberry Pi 4 Model B with 4GB RAM, featuring a pre-loaded 32GB microSD card, high-gloss case with integrated fan mount, low-noise cooling system, 3.5A USB-C power supply, heat sinks, and a 6-foot display cable supporting up to 4K60p. Includes the CanaKit USB-C PiSwitch for power control.
Pros:
- Includes all essential components for Raspberry Pi setup
- High-quality cooling system with low-noise fan
- Supports 4K60p display output
Cons:
- No smart home compatibility
- Does not include a monitor or keyboard
Best for: Teams whose project requirements fit the documented Raspberry Pi 4 kit
Not ideal for: Workflows needing accessories or capabilities not confirmed in the kit details
Bottom line: Check kit contents, software support, and connection needs before choosing the CanaKit Raspberry Pi 4 4GB Starter PRO Kit.
For a budget-first build, buy in the order that removes the biggest unknowns: start with the tools needed for your core test procedure, then add capture or measurement gear when the workflow calls for it. Define compatibility, channel, connector, and power requirements first so each purchase has a clear role in the test bench.
You do not need to assemble every slot at once. Begin with the equipment that supports your next planned test, document what works in your setup, and expand the checklist as new needs emerge. A little preparation makes it easier to choose tools that fit your actual workflow.