To make tissue paper flowers, start by stacking 6 to 12 sheets of square tissue paper in your chosen colors. Fold the stack accordion-style, then secure the center with a twist tie or floral wire to create a stem. Fan out the layers and gently pull apart each layer to form petals. Shape and fluff the petals for a realistic look. Keep practicing different techniques and color combinations to craft stunning arrangements easily. If you continue, you’ll learn even more tips and tricks.
Key Takeaways
- Gather square tissue paper sheets, typically 6-12 layers, and fold accordion-style to prepare for shaping.
- Twist or tie the center with floral wire or twist ties to form the flower’s core.
- Carefully fan out and layer the tissue paper, then gently pull apart each layer to create petals.
- Fluff and shape individual petals for a full, realistic appearance, adjusting for desired size and fullness.
- Arrange the completed flowers in vases or clusters, adding greenery or decorations for enhanced display.

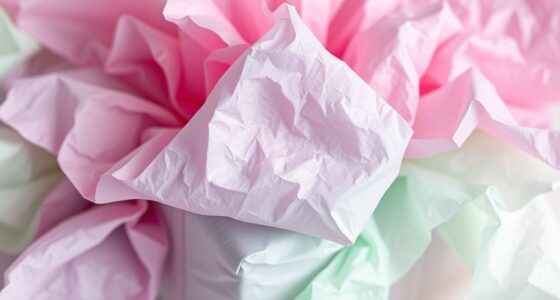
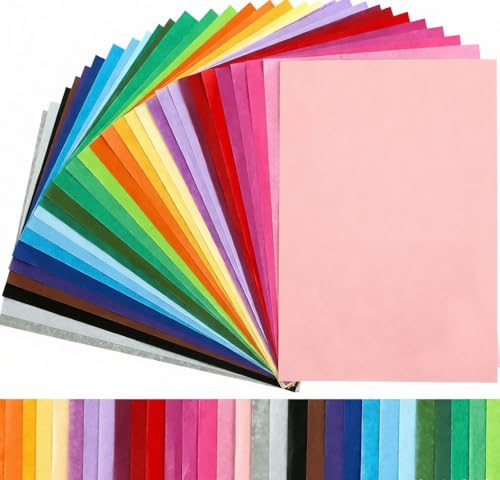
Tissue paper flowers are a simple, beautiful craft that can brighten up any space. Whether you’re decorating a birthday party, sprucing up your home, or creating a personalized gift, these flowers add a charming touch. The key to making eye-catching tissue flowers lies in choosing the right flower color schemes. You can opt for a monochrome palette for a sleek, modern look, or mix vibrant and pastel shades for a lively, festive vibe. Combining contrasting colors can make your DIY flower arrangements pop, while soft tones lend a subtle elegance. Think about the mood you want to create and select your colors accordingly. Bright reds, pinks, and yellows evoke cheerful energy, perfect for celebrations, while whites, blushes, and soft blues create a calming atmosphere.
Creating your tissue paper flowers is straightforward and allows for lots of creativity. Start by selecting your tissue paper, usually in square sheets. You can experiment with different textures and finishes, like matte or glossy, to add visual interest. To make a basic flower, stack several sheets—anywhere from 6 to 12—folding them accordion-style. Once folded, you’ll gather the center with a twist tie or floral wire, which acts as the stem. Next, carefully fan out each layer and gently pull apart the sheets, fluffing and shaping each petal to achieve a full, realistic look. For a more intricate flower, you could layer different shades or sizes of tissue to create depth and dimension.
When assembling your DIY flower arrangements, think about how the flowers will work together. Grouping similar colors can create a cohesive, elegant display, while mixing contrasting hues can make your arrangement more dynamic. You might place a cluster of bright yellow flowers in a tall vase for a cheerful centerpiece or spread a few pastel blooms across a table for a soft, romantic feel. Adding greenery or other decorative elements can enhance the overall look and make your arrangement more natural and appealing. Experimenting with different flower color schemes allows you to tailor each arrangement to suit the occasion or space you’re decorating.
In the end, making tissue paper flowers is not just about the craft itself but about expressing your creativity. With a little practice, you’ll discover how simple color choices and thoughtful arrangements can transform ordinary spaces into vibrant, personalized displays. Whether you keep your DIY flower arrangements for yourself or give them as thoughtful gifts, your effort will surely brighten anyone’s day.

PACON "KolorFast Tissue Flower Kit, Party Pack, 10"", 84 Flowers" (P0059660)
Party pack
As an affiliate, we earn on qualifying purchases.
As an affiliate, we earn on qualifying purchases.
Frequently Asked Questions
What Types of Tissue Paper Work Best for Flowers?
You should use lightweight, slightly textured tissue paper for the best flowers. Choose vibrant tissue paper colors to make your blooms pop, and opt for tissue with a soft, crinkled texture to mimic real petals. Thinner tissue sheets are easier to manipulate and create more natural-looking petals, while thicker ones hold shape better. Combining different colors and textures allows you to craft stunning, realistic tissue paper flowers.
How Long Do Tissue Paper Flowers Last Indoors?
While delicate, tissue paper flowers can last for about a week indoors when properly preserved. You can extend their indoor longevity by avoiding direct sunlight and humidity, which cause fading and deterioration. To maximize flower preservation, gently dust them and keep them in a cool, dry spot. Their ephemeral beauty offers a fleeting elegance, reminding you that even the most delicate creations can provide lasting joy with proper care.
Can I Make Tissue Paper Flowers Waterproof?
Yes, you can make tissue paper flowers waterproof by applying a clear sealant or spray, which helps protect your flower arrangement from moisture. When choosing your color selection, opt for vibrant shades that won’t fade easily. Keep in mind, waterproofing may slightly alter the texture and appearance, so test it on a small section first. This way, your tissue paper flowers stay beautiful longer, even in damp environments.
Are There Eco-Friendly Tissue Paper Options?
Yes, you can find eco-friendly tissue paper options that are biodegradable and sustainably sourced. Look for brands that prioritize sustainable sourcing practices and use biodegradable materials, reducing environmental impact. These alternatives are perfect if you want to create beautiful tissue paper flowers while being eco-conscious. By choosing eco-friendly tissue paper, you support sustainable practices and help reduce waste, making your craft projects more environmentally responsible and enjoyable.
How Can I Reuse or Recycle Tissue Paper Flowers?
Imagine your tissue paper flowers blooming once more, their delicate layers whispering stories of sustainability. You can reuse them by gently storing for future events or repurpose their petals for gift wrapping or DIY art projects. When they’re no longer suitable for reuse, consider tissue paper recycling. This eco-friendly approach guarantees your sustainable decorating efforts leave a minimal footprint, turning beautiful, ephemeral blooms into resources for new creative endeavors.
KESOTE Tissue Paper Bulk for Crafts 11.5" x 8" Assorted Colored 300 Sheets 30 Colors Rainbow Tissue Paper for Holidays Christmas Halloween DIY Flower Pom Pom
BULK TISSUE PAPER – Includes 300 small sheets art tissue paper in 30 colors
As an affiliate, we earn on qualifying purchases.
As an affiliate, we earn on qualifying purchases.
Conclusion
So, after all that fuss, you’ve created beautiful tissue paper flowers—an impressive feat, considering how simple they are. Who knew that something so delicate could turn out so stunning? It’s almost ironic how a few folds and cuts can transform plain paper into a charming decoration. Now, the real challenge is not ruining your new masterpiece before showing it off. But don’t worry—if you do, just make more. It’s all part of the fun!

100 PCS 18 Gauge Green Floral Wire Stems for Artificial Flower Making,Flexible Paddle Wires for Crafts Festival Flowers,Garland and Floral Arrangements,Florist Wire,Flower Wires for Crafts
Multiple Sizes and Colors: Our flower stems are 35cm long and come in three basic sizes – 50…
As an affiliate, we earn on qualifying purchases.
As an affiliate, we earn on qualifying purchases.

CEMABT Glass Vases for Flowers,Thickened 3.4 lb Morden vases for Tables Centerpieces, vase for Home Decor, Crystal,Colorful and Clear Rose Large Vases Christmas Day Gifts(Heavy Duty)
❀【Vases for Flowers】This glass vase makes your flowers more beautiful,Four unique colors to choose from in the vase…
As an affiliate, we earn on qualifying purchases.
As an affiliate, we earn on qualifying purchases.